Having carried all all of the tasks that were assigned to me this term I feel that we once again achieved our goals and in some instances surpassed our previous expectations. In terms of the technical role that I played in the 3D elements of the spitfire project, I created the plane rig and the pilot rig, both of which fulfilled their needs. In particular, the pilot rig was robust and realistic enough to create necessary kinematics of a human. I even created a 30 second test animation to test the digital asset in which I tested various basic ideas that the rig may need to endure.
On the other hand, when involved with the "Mission Control" project that was running side by side, I had to create a dynamic rig that had features similar to those that one may find in a cartoon character. This was one of the most difficult rigs that I made this year since I added stretchy limbs functionality and also had to deal with the added complication of rigging a skirt.
However some of the best breakthroughs that we made were as a group. We managed to increase the productivity of our pipeline greatly simply by introducing common sense problems, highlighting the bottle necks and then solving them. We introduced the idea of referencing- a great way for every person to begin working with the assets that they had hence giving departments such as Modelers and Riggers etc. a freedom to work with files that were yet to be finished.
After accomplishing this we created a fantastic method of updating files so that everyone could have access to the most recent files without anyone losing the work that they had done. We used a file sharing application called dropbox where all members had their own folders. This way, when ever there was an update in the model or the rig for animation, we all could immediately access the necessary files.
In conclusion, great deal has been learned that has developed our maturity in the production of CG films. I feel that I am on the right track to being a professional and that this unit along with fulfilling the needs of a client. This unit has brought the reality of the industry to the student and will be able to take a great deal away from this. Again all of this was done with some great team work that all came together at the right time, another skill that is crucial in the industry.
Thursday, 16 June 2011
Sunday, 12 June 2011
An animation test
Having completed the rigging for the Pilot I was highly motivated to create a short animation to test the rig. I initially blocked out a few ideas that it would be a very nice sequence to have the pilot take off or land, walking either to or from the plane. This would both give a detailed view into the assets that a seen either moving fast or from far away.
Here is the progress of my scene as I animated.
Here is the final animation that I finished. Since it was simply an animation test there was no need to have fully rendered textures etc. Some of the benefits of using simple white shaders is that one can see obvious problems if the model did not work.
Saturday, 4 June 2011
Th Pilot Rig (part 2)
The following videos and images show the development of the rig in its painted weights stage. Having followed an essential naming strategy I was easily able to select the joints that were to be bound and skin them appropriately to the mesh.
Here is the final version of the rig that would be used in the final piece if and when necessary. Creating this digital asset is a very important as a pre-production project.
Here is the final version of the rig that would be used in the final piece if and when necessary. Creating this digital asset is a very important as a pre-production project.
Monday, 23 May 2011
Th Pilot Rig (part 1)
The following shows the progress of my Pilot rig in its initial stages.


This particular rig was a very challenging piece of work. Rather than setting up the IK spline that may usually go into creating the back joints, I followed a tutorial that builds all the components of the IK spline from scratch. We start with a a set of disjoined joints placed along the spine. A CV curve is then placed on each joint. From here the details are rather complicated, but to summarize the back was eventually made from two sets of spine joints, with an additional neck joint at the top and a root bone at the base of the spine. Eventually the goal of this set up is to create an advance twist function that can more accurately create human postures.


With all the fundamental objects in place, it was now time to fix the appropriate expressions and connections that will eventually govern them. Here are the results from the set up. At this point rotations in one orientation are affecting the locators when the actual twist hasn't been set up. In the next post you may see the fully working spine
Th Pilot Rig- Functionality
Having finished the spitfire rig, I was assigned the task of creating the pilot rig. The functionality of the rig is an essential question. Unlike the rig I made for the Rocket Girl from the Mission Control project, I am not required to make a rig with cartoony features. However I still want to create a rig that was both versatile and robust character set up that can create a realistic humanoid rig.
The rig is needed to be a pilot- so it is very possible that the lower half of the rig may never be seen whilst the pilot is flying. However, the scope of our project is to create assets that develop the pre-production of a film, and to have a fully rigged character was an essential part of our brief, even if we are unable to see a great deal of him. If it is possible, we may be able to incorporate a scene where the pilot rigs functionality is in full view.
Funtionality of rig
character should be able to:
Sit in the cockpit
Press buttons, levers
Stand along side his plane
Carry out a basic walk cycle
the character does NOT need to be able to:
squash/stretch
have facial expressions
do anything unrealistic/ over exaggerated
With this in mind, I start making the building blocks of a humanoid rig.
Saturday, 14 May 2011
Introduction of Dropbox
As a group I feel that we had really progressed in our level of maturity. However talented one may be at the "particular aspects" of 3D animation, it generally is the case that organising the way in which we do "the particulars" can yield a greater number of man hours in which we can improve our product. Although we all still could improve as artists, as young proffessionals we had started thinking of ways in which we could do things more efficiently. Our first step was to consider using referencing in order for all members to be working all of the time. We found that this greatly increased the productivity of our pipeline and also the flexibility in which we can alter things.
However, it became apparent that even this may not be optimized yet. Now that things were getting more and more complicated with more files going back and forth between animators, riggers, trackers and moddler, we noticed another place for improvement: file sharing.
Given that we are all working on the same project with the same files, would it not be a great idea to be able to share some virtual space where we could access? Greg first proposed the idea to Ollie and then myself. After going through all of the implications that may arise we were delighted to have the addition of dropbox into our workflow.
Basically dropbox is an online storage space that takes a designated folder and memory space on your workstation. When you are connected to the internet, a total of 50GB is synced with the dropbox account. This is allowed across any number of machines.
As a group we were all able to have a work folder each- one for rigging, modelling, animating etc under each student. This meant that we were all able to access everyones work and see the collective progress that was being made. For example I would be able to see playblasts from animation and test renders as they were being done! This was a fantastic idea and with this use of skype, we were able to communicate ideas with great precision and speed.
Wednesday, 11 May 2011
Problems with Maya Referencing
Although we attempted to the best of our abilities to use referencing to aid our pipelining we soon discovered that maya created some major anomalies when put in to practice.
Our first problem occurred when I first started referencing the model for the rigging file. Soon after updating the model. I discovered that the regions that had been altered and modified in modelling would inherit some major anomalies when replacing the old file that I was originally working with. Here are a few snapshots of some of the problems that we encountered.
In this case, modifications (i.e edgeloops), were made to the back wheel

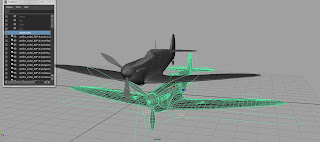
This video indicates an even greater exaggeration of the same problem where modifications were made to the wing flaps.
We tried to identify what the problem may have been. We discovered that any changes made through changing edgeloops, duplication created these problems. We also tried to see whether it was the face normals or naming conventions of the model pieces. Unfortunately after a great deal of troubleshooting with little results, we decided to bypass the problem.
Since the rig that I was designing was based purely off parenting geometry to to control curves with the appropriate pivot points, once the control curves had been set up, then the majority of the work was done. The only re-working required was to remove the original referencing in the scene that was not working. Then you would have to re-create the reference, and finally one would have to re-parent the geometry to the control curves with the appropriate pivot points.
The following shows two reference files in one scene whilst replacing the old model with the new.
Once this fairly fast process had been done, then the model and rig reference would be replaced and set up for the animators who would continue animation.
Although this is not an ideal solution to our problem, we found it effective for our immediate purposes. We did however try to imitate a professional production line to the best of our abilities given the constraints that we faced.
Our first problem occurred when I first started referencing the model for the rigging file. Soon after updating the model. I discovered that the regions that had been altered and modified in modelling would inherit some major anomalies when replacing the old file that I was originally working with. Here are a few snapshots of some of the problems that we encountered.
In this case, modifications (i.e edgeloops), were made to the back wheel

This video indicates an even greater exaggeration of the same problem where modifications were made to the wing flaps.
We tried to identify what the problem may have been. We discovered that any changes made through changing edgeloops, duplication created these problems. We also tried to see whether it was the face normals or naming conventions of the model pieces. Unfortunately after a great deal of troubleshooting with little results, we decided to bypass the problem.
Since the rig that I was designing was based purely off parenting geometry to to control curves with the appropriate pivot points, once the control curves had been set up, then the majority of the work was done. The only re-working required was to remove the original referencing in the scene that was not working. Then you would have to re-create the reference, and finally one would have to re-parent the geometry to the control curves with the appropriate pivot points.
The following shows two reference files in one scene whilst replacing the old model with the new.

Once this fairly fast process had been done, then the model and rig reference would be replaced and set up for the animators who would continue animation.
Although this is not an ideal solution to our problem, we found it effective for our immediate purposes. We did however try to imitate a professional production line to the best of our abilities given the constraints that we faced.
Subscribe to:
Comments (Atom)