Having carried all all of the tasks that were assigned to me this term I feel that we once again achieved our goals and in some instances surpassed our previous expectations. In terms of the technical role that I played in the 3D elements of the spitfire project, I created the plane rig and the pilot rig, both of which fulfilled their needs. In particular, the pilot rig was robust and realistic enough to create necessary kinematics of a human. I even created a 30 second test animation to test the digital asset in which I tested various basic ideas that the rig may need to endure.
On the other hand, when involved with the "Mission Control" project that was running side by side, I had to create a dynamic rig that had features similar to those that one may find in a cartoon character. This was one of the most difficult rigs that I made this year since I added stretchy limbs functionality and also had to deal with the added complication of rigging a skirt.
However some of the best breakthroughs that we made were as a group. We managed to increase the productivity of our pipeline greatly simply by introducing common sense problems, highlighting the bottle necks and then solving them. We introduced the idea of referencing- a great way for every person to begin working with the assets that they had hence giving departments such as Modelers and Riggers etc. a freedom to work with files that were yet to be finished.
After accomplishing this we created a fantastic method of updating files so that everyone could have access to the most recent files without anyone losing the work that they had done. We used a file sharing application called dropbox where all members had their own folders. This way, when ever there was an update in the model or the rig for animation, we all could immediately access the necessary files.
In conclusion, great deal has been learned that has developed our maturity in the production of CG films. I feel that I am on the right track to being a professional and that this unit along with fulfilling the needs of a client. This unit has brought the reality of the industry to the student and will be able to take a great deal away from this. Again all of this was done with some great team work that all came together at the right time, another skill that is crucial in the industry.
Thursday, 16 June 2011
Sunday, 12 June 2011
An animation test
Having completed the rigging for the Pilot I was highly motivated to create a short animation to test the rig. I initially blocked out a few ideas that it would be a very nice sequence to have the pilot take off or land, walking either to or from the plane. This would both give a detailed view into the assets that a seen either moving fast or from far away.
Here is the progress of my scene as I animated.
Here is the final animation that I finished. Since it was simply an animation test there was no need to have fully rendered textures etc. Some of the benefits of using simple white shaders is that one can see obvious problems if the model did not work.
Saturday, 4 June 2011
Th Pilot Rig (part 2)
The following videos and images show the development of the rig in its painted weights stage. Having followed an essential naming strategy I was easily able to select the joints that were to be bound and skin them appropriately to the mesh.
Here is the final version of the rig that would be used in the final piece if and when necessary. Creating this digital asset is a very important as a pre-production project.
Here is the final version of the rig that would be used in the final piece if and when necessary. Creating this digital asset is a very important as a pre-production project.
Monday, 23 May 2011
Th Pilot Rig (part 1)
The following shows the progress of my Pilot rig in its initial stages.


This particular rig was a very challenging piece of work. Rather than setting up the IK spline that may usually go into creating the back joints, I followed a tutorial that builds all the components of the IK spline from scratch. We start with a a set of disjoined joints placed along the spine. A CV curve is then placed on each joint. From here the details are rather complicated, but to summarize the back was eventually made from two sets of spine joints, with an additional neck joint at the top and a root bone at the base of the spine. Eventually the goal of this set up is to create an advance twist function that can more accurately create human postures.


With all the fundamental objects in place, it was now time to fix the appropriate expressions and connections that will eventually govern them. Here are the results from the set up. At this point rotations in one orientation are affecting the locators when the actual twist hasn't been set up. In the next post you may see the fully working spine
Th Pilot Rig- Functionality
Having finished the spitfire rig, I was assigned the task of creating the pilot rig. The functionality of the rig is an essential question. Unlike the rig I made for the Rocket Girl from the Mission Control project, I am not required to make a rig with cartoony features. However I still want to create a rig that was both versatile and robust character set up that can create a realistic humanoid rig.
The rig is needed to be a pilot- so it is very possible that the lower half of the rig may never be seen whilst the pilot is flying. However, the scope of our project is to create assets that develop the pre-production of a film, and to have a fully rigged character was an essential part of our brief, even if we are unable to see a great deal of him. If it is possible, we may be able to incorporate a scene where the pilot rigs functionality is in full view.
Funtionality of rig
character should be able to:
Sit in the cockpit
Press buttons, levers
Stand along side his plane
Carry out a basic walk cycle
the character does NOT need to be able to:
squash/stretch
have facial expressions
do anything unrealistic/ over exaggerated
With this in mind, I start making the building blocks of a humanoid rig.
Saturday, 14 May 2011
Introduction of Dropbox
As a group I feel that we had really progressed in our level of maturity. However talented one may be at the "particular aspects" of 3D animation, it generally is the case that organising the way in which we do "the particulars" can yield a greater number of man hours in which we can improve our product. Although we all still could improve as artists, as young proffessionals we had started thinking of ways in which we could do things more efficiently. Our first step was to consider using referencing in order for all members to be working all of the time. We found that this greatly increased the productivity of our pipeline and also the flexibility in which we can alter things.
However, it became apparent that even this may not be optimized yet. Now that things were getting more and more complicated with more files going back and forth between animators, riggers, trackers and moddler, we noticed another place for improvement: file sharing.
Given that we are all working on the same project with the same files, would it not be a great idea to be able to share some virtual space where we could access? Greg first proposed the idea to Ollie and then myself. After going through all of the implications that may arise we were delighted to have the addition of dropbox into our workflow.
Basically dropbox is an online storage space that takes a designated folder and memory space on your workstation. When you are connected to the internet, a total of 50GB is synced with the dropbox account. This is allowed across any number of machines.
As a group we were all able to have a work folder each- one for rigging, modelling, animating etc under each student. This meant that we were all able to access everyones work and see the collective progress that was being made. For example I would be able to see playblasts from animation and test renders as they were being done! This was a fantastic idea and with this use of skype, we were able to communicate ideas with great precision and speed.
Wednesday, 11 May 2011
Problems with Maya Referencing
Although we attempted to the best of our abilities to use referencing to aid our pipelining we soon discovered that maya created some major anomalies when put in to practice.
Our first problem occurred when I first started referencing the model for the rigging file. Soon after updating the model. I discovered that the regions that had been altered and modified in modelling would inherit some major anomalies when replacing the old file that I was originally working with. Here are a few snapshots of some of the problems that we encountered.
In this case, modifications (i.e edgeloops), were made to the back wheel

This video indicates an even greater exaggeration of the same problem where modifications were made to the wing flaps.
We tried to identify what the problem may have been. We discovered that any changes made through changing edgeloops, duplication created these problems. We also tried to see whether it was the face normals or naming conventions of the model pieces. Unfortunately after a great deal of troubleshooting with little results, we decided to bypass the problem.
Since the rig that I was designing was based purely off parenting geometry to to control curves with the appropriate pivot points, once the control curves had been set up, then the majority of the work was done. The only re-working required was to remove the original referencing in the scene that was not working. Then you would have to re-create the reference, and finally one would have to re-parent the geometry to the control curves with the appropriate pivot points.
The following shows two reference files in one scene whilst replacing the old model with the new.
Once this fairly fast process had been done, then the model and rig reference would be replaced and set up for the animators who would continue animation.
Although this is not an ideal solution to our problem, we found it effective for our immediate purposes. We did however try to imitate a professional production line to the best of our abilities given the constraints that we faced.
Our first problem occurred when I first started referencing the model for the rigging file. Soon after updating the model. I discovered that the regions that had been altered and modified in modelling would inherit some major anomalies when replacing the old file that I was originally working with. Here are a few snapshots of some of the problems that we encountered.
In this case, modifications (i.e edgeloops), were made to the back wheel

This video indicates an even greater exaggeration of the same problem where modifications were made to the wing flaps.
We tried to identify what the problem may have been. We discovered that any changes made through changing edgeloops, duplication created these problems. We also tried to see whether it was the face normals or naming conventions of the model pieces. Unfortunately after a great deal of troubleshooting with little results, we decided to bypass the problem.
Since the rig that I was designing was based purely off parenting geometry to to control curves with the appropriate pivot points, once the control curves had been set up, then the majority of the work was done. The only re-working required was to remove the original referencing in the scene that was not working. Then you would have to re-create the reference, and finally one would have to re-parent the geometry to the control curves with the appropriate pivot points.
The following shows two reference files in one scene whilst replacing the old model with the new.

Once this fairly fast process had been done, then the model and rig reference would be replaced and set up for the animators who would continue animation.
Although this is not an ideal solution to our problem, we found it effective for our immediate purposes. We did however try to imitate a professional production line to the best of our abilities given the constraints that we faced.
Monday, 9 May 2011
Rigging the Plane (part 3) Finalizing and Testing
After fixing the majority of the rig controls I had finalized the spitfire. Here are the test videos that indicate that the rig has been limited, locked and presented as necessary for the animators use.
Saturday, 7 May 2011
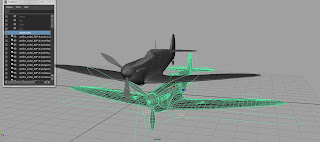
Rigging the Plane (part 2)
This is an intermediate post to indicate the progression of the design rig. After more analysing and tweaking it became apparent that the rig should be completely dummy proof. We don't not want any controls available to the animator other than the required ones, and that too, between certain limits of extremum. We also want nohing other than the control curves to be selectable. With this in mind I went through every control and measured what should and shouldn't be possible for the rig to achieve. I also added some more controls that were not originally included in my initial design (like the back wheel and the box styled object under the wing)
Again we must also mention that the model had been updated a certain number of times and had to be re-parented appropriately due to a problem with referencing whic I will detail in a later post (See the "Problems with Maya Referencing" post later in this blog).
The updated UV'd model

The re-rigged plane with additional controls


Overall I am very pleased by the design of this rig. My most important feedback came from my animators who, even though did not have a finished rig, were still able to reference using what I provided to constructively criticize my rig for the projects benefit.
Here is my first recorded rigging test.
Tuesday, 3 May 2011
Rigging the Plane (part 1)
Having looked into the rough mechanics by which a spitfire functions, I began rigging the spitfire model. Since a plane is a solid collection of rigid moving parts there was no need to consider skinning/binding or painting weights. I decided to create a collection of control curves positioned in the correct way to creatively fit around the plane. From here I would be able to do direct parenting of the geometry to the control curves. Since the function of the direct parent method takes the child and makes it move (translate and rotate and scale) according to the pivot of the parent, we need to only adjust the pivot of the control curve.
Note- When referencing, it can be problematic to have groups/parenting or any key frames in the reference file. If parents have been made in a reference file, you may encounter an error as I did reading: "Can not re-parent from reference file". This was an initial problem for us that was easily resolvedby editing the model ref file. Similarly if any keyframe remain latent from a rig ref- the animation file will have those controls/attributes locked until they too are manually delated from the original ref file.
It is my job as a rigger to create controls that are both appealing and functional without any ambiguity. I had a good idea from the research I had done to know where to place the relevant controls and the generic design required. Having been used to character rigs, I found that I was more focussed on functionality and simplicity. Here are a few snapshots of the spitfire early on.
The first model ref draft

My first basic rig designs


Having placed the controls, I still had to correctly rotate all pivot points into their correct rotation axis. Here you may identify that although the positioning of the controls are correct, the way in which all controls rotate are not aligned.
Note- Once you have aligned the rotation axis correctly, do not freeze transformations as this resets the alignment of the rotation. You may, as I did, mysteriously find that your controls keep reseting after all of the efforts undergone to fix it! Keep this in mind for future reference.
Thursday, 28 April 2011
Research into the Spitfire
In order to rig the moving parts of a spitfire I would have to first analyze its structure. By doing this and understanding how the spitfire was built, I would be able to study other resources such as live footage to then have enough information to make an informed decision about the rig.
My first sources of resources were images taken from air shows and live footage and blue prints.
In the following piece we can see the moving points of the spitfire to a great degree of detail. We can see the physical nuts and bolts the comprise the mechanics of the landing gears, the cockpit, the wing flaps etc.


The following video footage was key in getting an even better idea of the actual aerodynamics of the spitfire. Although some of the models may vary, we can ascertain a great deal of information about the movements of the wing-flaps, landing gear, tail flaps, propellor etc.
Using all of the collective resources, I am now in a position to make informed choices about the rig. I have a far greater understanding of the dynamics and animation required for the spitfire project. I feel that the research has clarified the limitations of the rig, the functionality of the rig and has also given my a number of ways of creatively making the necessary control curves.
My first sources of resources were images taken from air shows and live footage and blue prints.
In the following piece we can see the moving points of the spitfire to a great degree of detail. We can see the physical nuts and bolts the comprise the mechanics of the landing gears, the cockpit, the wing flaps etc.


The following images show the spit fire in mid flight and give an even more in depth perspective of their mechnisms. The first images give one a very good idea of how the landing gears work and even how the centre of gravity acts on this massive, dynamic object.
Spitfire mid-landing

Spitfir mid-landing

Spitfire stationary

Spitfire mid flight

Spitfire taxi-ing on the ground

Spitfire mid-flight

The following video footage was key in getting an even better idea of the actual aerodynamics of the spitfire. Although some of the models may vary, we can ascertain a great deal of information about the movements of the wing-flaps, landing gear, tail flaps, propellor etc.
Using all of the collective resources, I am now in a position to make informed choices about the rig. I have a far greater understanding of the dynamics and animation required for the spitfire project. I feel that the research has clarified the limitations of the rig, the functionality of the rig and has also given my a number of ways of creatively making the necessary control curves.
Monday, 25 April 2011
Referencing With More Rigour- Our Formed Pipeline
Now with a referncing test undergone, I was now ready to take a first draft of the model and begin rigging.
There are a few things that my group considered before we began anything. We had to consider the risks that were involved in referncing. The most major concer is that the process involves replacing files. If for some reason the reference did not work it could jepordize work in the next stage of the pipeline. e.g if the model was updated, and the rigging ref was no longer compatible then the rigging would need to begin from scratch again. Similarly if the rig is updated to an animators project and was not working with his animation, then all of the animation work coulld amount to nothing.
For this reason it was esssential for us all to have a convension that we all had to stick to. As Ollie would update his modelling, he would have a number of versions of his model. He would name then something like "spitfire_model_REFver###" where ### maybe a number. when he was ready, he would send me a file named "spitfire_model_REF". I would use this as my reference and create a rigging version "spitfire_rig_REFver###" where ### number is my versioning of the rig.
As Ollie would work on his model and wish to send me an update, he would save a versioned copy, and then overwrite the file to "spitfire_model_REF" again. I would use this file and replace my old reference with the new one. Now when I open my latest rigging file, it should be referencing the new spitfire model. However, in the event that the rig did not work with the modelling file, we could always find a previous version for when the model last worked with the rig.
Before passing this on to the animators, it was good for us to test it out at the rigging phase. If al was okay, i would save my latest rigging file as "spitfire_rig_REF". I would then pass on my latest rig and Ollies latest model to the animators whose files should then automatically update. Again, should we run into any errors along the way, we would always be able to come back to a place where a version of the rig and model was working.
We have a similar convension planned for lighting and other aspects.
Friday, 22 April 2011
Research into Referencing
In the previous post we faced a bottle necking problem in the pipeline that slowed down productivity and also didn't allow the flexibility to evolve ideas.
Myself, Ollie and Greg sat and discussed methods of improving our pipeline and stumbled across a topic in Maya called referencing.
Similar methods are used in industry to allow overlapping of work rather than the 'ast job finishes and the next job begins' approach which seems ameture and unprofessional.
From the research that we had done, it seemed that referencing was a very simple cocept that would solve many of our problems. Take the example of the link between modelling and rigging. A draft of the model is passed on to the rigger who starts rigging.
Instead of physically imorting the moddling data into his rigging file, he simply references it at a certai path loction on the computer. The name and the location of this file is very important. Now lets say that a week later the moddler has made some additions/modifications to the model. The rigger should simply need to take the new moddling file, replace the old model reference with the new one. Now when the rigger has opened his rigging file, it will update with the new version of the model. Now the rigger can continue to develop the rig without having lost any of the work he did to the old version.
The same concept can be applied to animation. So the animators can recieve a rig draft. They start animating using the rig reference file. Some time later the rigger may come back with a more detailed version of the rig which can replace the old one and then be used for more animation to build on the previous work.
This allows the modeller, rigger, tracking artists, animators to be working on there individual aspects for a greater duration of the project. This will results in greater productivity, a more flexible product with a much lower risk of failure to meet a deadline.
Here are some websites that allowed us to understand the referencing concept to a greater level.
http://www.3dfiggins.com/writeups/mayaReference/
This video also greatly assisted me in my initial understanding.
However my greatest resource in understanding more about referncing was digital tutors. I used many of their tutorials to help me see referncings uses and practical implementations.
Monday, 18 April 2011
The Rigging Pipeline
In previous projects that I have been involved in the pipelining was ineffeicient but simple. First the model would be made early on. Once finalized, the UV'ing of the model and texturing before starting and binding the final rig. Even from here the animation would begin only when the rig had been completely done. One can clearly see that there are problems with this method.
Problem 1: Ineffeicient
In an ideal situation, you should be working at all times wherever you are in the pipeline. Sometimes due to the dependancy of some jobs in relation to others, this is not always possible. Hoevever by having to complete a model before rigging, having to complete a rig before animating etc, we soon see that we have alot of idle time for a great deal of the project. This is a waste of human resources and does not make the best use of the availible man power.
Problem 2: Restrictive
By having our work in a very modular style we lack the ability to go back in the pipeline. Once the model or the rig is finished then we can no longer go back to it. Lets say that some where down the timeline we decide to change a small element of the model whilst we had already reached animation phase of the project. We would have to ammend the model, redo the rig and reanimate the scene. This is not a viable option. The same goes with the texturing or the rigging or the lighting etc. We are unable to adapt or evolve our concepts, when evolution of a concept may be essential to the improvment of the final piece. (especially as more and more research is done)
Problem 3: Causes Rushing
We have already mentioned how each member of the pipeline is dependent on the task prior to them thus leaving ample amounts of idle time. However the flipside tio this is that when the task is assigned, we are each forced to work to a very immediate deadline. This means having to rush to complete your job and doing it 100% correctly in the first go. In my particular field this can be devestating since a rig concerns technical kinematic controls. Should there be a malfunction that may be discovered during animation (relativley close to the end of the project) then we would all be in a great deal of trouble.
With this in mind me and my group decided that we would be able to optimize both our efficiency and quality of work if we adopted some way of being able to work n our individual parts throughout the entirety of the project whist being able to update evryones project files to seamlessly integrate the newst 3D assets.
Wednesday, 13 April 2011
Unit Introduction
Sanjay Sen Industry Exercises 3 Brief Breakdown.
In this Unit I will be involved in the successful delivery of two projects.
Project 1: Spitfire Project
This is a client based project set to us by a Framestore Director. He has assigned us the job of creating a Pre-visualisation of a potential film based on a World War 2 fighter Pilot.
Our task as a group is to create a realistic aviation scene with a take-off/landing sequence. The piece must be photorealistic, believable and to a professional standard.
My role in this project will be to create both an animator friendly rig for the plane such that it carries out all functionality and also to create a pilot rig who will be seated in the cockpit. I also may be assisting with any dynamics.
Project 2: Mission Control
This is a third year student based project. Being part of the rigging for his main character, it will be my job to create a cartoon styled rig with great capability.
Again this project is constrained to a deadline and working along side a team within a pipeline.
These two projects, whose progress will be documented on separate blogs, will constitute the work of this unit on which I should be marked on.
Monday, 11 April 2011
Post 1: Two projects, One Unit
This blog documents the unit Industry Exercises 3.
Myself and other members of my group have decided to partake in two projects that both be assessed with this unit.
This blog follows the development of thhe "Spitfire" project.
The following is a link to the "Mission Control" project.
http://ravesanjaysenindustryexercises3.blogspot.com/
Myself and other members of my group have decided to partake in two projects that both be assessed with this unit.
This blog follows the development of thhe "Spitfire" project.
The following is a link to the "Mission Control" project.
http://ravesanjaysenindustryexercises3.blogspot.com/
Subscribe to:
Comments (Atom)